How To Create a Secure Login Page Using HTML, CSS, and JavaScript
As you study web development For novice to intermediate web developers, building a website with a login and registration form can be the ideal job.
Today in this blog you will learn how to build a website that includes a Login and Registration Form using HTML, CSS, and JavaScript. While I have previously designed many websites with Login and Registration Forms, they were created as separate entities.
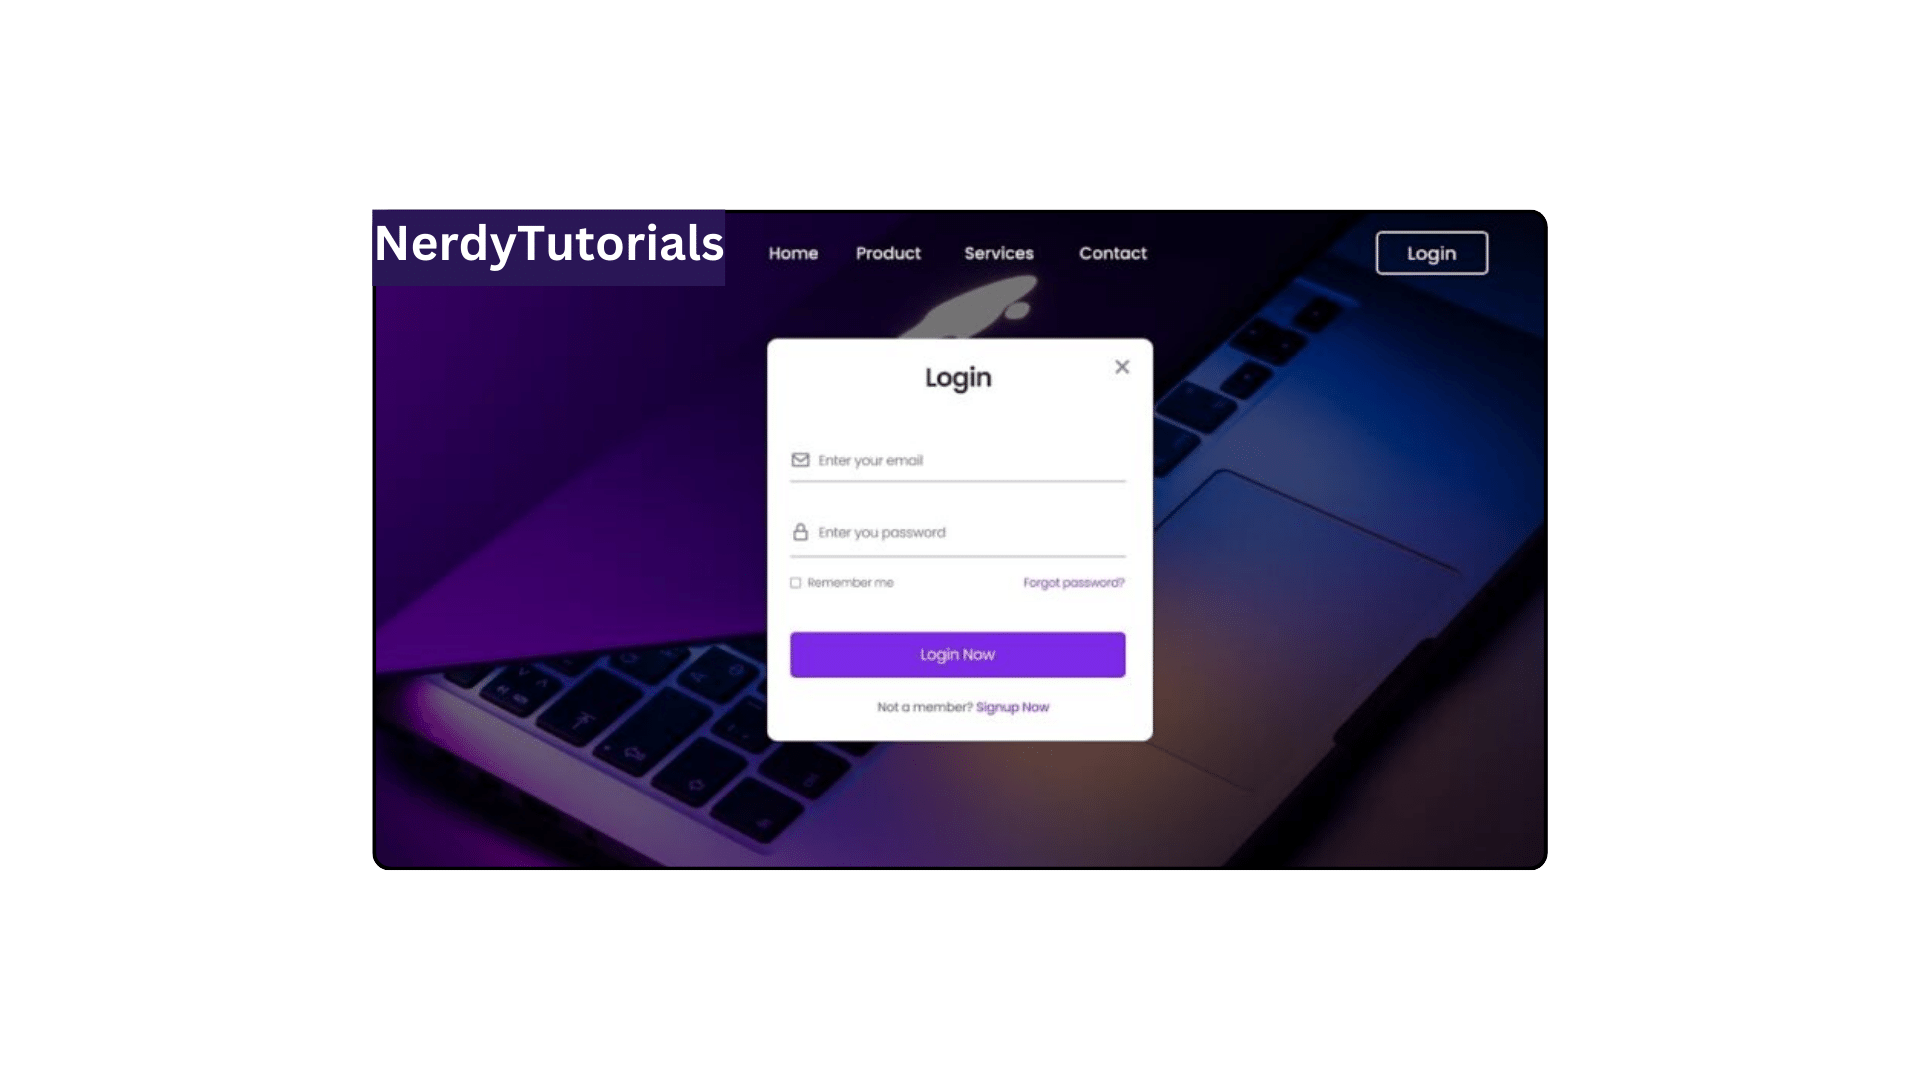
The website that you will be learning to develop today has a login and signup form, as you can see in the provided image. The website will provide nav links with a button to toggle the form, as well as a navigation bar with the company logo. At the bottom of the form is a button that may be used to change between the login and registration forms.
You Might Like This:
- Create Website with Login & Registration Form Using HTML CSS and JavaScript
- Create A Responsive Image Slider Using HTML CSS and JavaScript
- How To Create Responsive Navigation Bar Uisng HTML CSS & JavaScript
- Navigation Bar with Scrolling to the Top Button
Create a Secure Login Page Using HTML, CSS, and JavaScript Video Tutorials
As demonstrated in the video tutorial of the website featuring a login and registration form, initially, a website with a navigation bar was presented. Upon clicking the login button, the login form was displayed, and upon clicking the signup button, the registration form appeared.
You should definitely view the offered video lesson. In the video lesson, I walk you through the process of creating a website that has a login and registration form step-by-step and provide comments on the code to help you understand it better.
Steps for Creating a Website with Login & Registration Form
To create a Website with Login & Registration Form using HTML, CSS, and vanilla JavaScript, follow the given steps line by line:
- Create a folder. You can name this folder whatever you want, and inside this folder, create the mentioned files.
- Create an
index.htmlfile. The file name must be index and its extension .html - Create a
style.cssfile. The file name must be style and its extension .css - Create a
script.jsfile. The file name must be script and its extension .js - Download the background image and put this image inside the project folder. This is the website background image.
Once you create these files, paste the given codes into the specified files. If you don’t want to do these then scroll down and download all the source code files of the Website with the Login & Registration Form, by clicking on the given download button.
First, paste the following codes into your index.html file.
<!DOCTYPE html>
<!-- Coding By CodingNepal - codingnepalweb.com -->
<html lang="en">
  <head>
    <meta charset="UTF-8" />
    <meta http-equiv="X-UA-Compatible" content="IE=edge" />
    <meta name="viewport" content="width=device-width, initial-scale=1.0" />
    <title>Website with Login & Registration Form</title>
    <link rel="stylesheet" href="style.css" />
    <!-- Unicons -->
    <link rel="stylesheet" href="https://unicons.iconscout.com/release/v4.0.0/css/line.css" />
  </head>
  <body>
    <!-- Header -->
    <header class="header">
      <nav class="nav">
        <a href="#" class="nav_logo">CodingLab</a>

        <ul class="nav_items">
          <li class="nav_item">
            <a href="#" class="nav_link">Home</a>
            <a href="#" class="nav_link">Product</a>
            <a href="#" class="nav_link">Services</a>
            <a href="#" class="nav_link">Contact</a>
          </li>
        </ul>

        <button class="button" id="form-open">Login</button>
      </nav>
    </header>

    <!-- Home -->
    <section class="home">
      <div class="form_container">
        <i class="uil uil-times form_close"></i>
        <!-- Login From -->
        <div class="form login_form">
          <form action="#">
            <h2>Login</h2>

            <div class="input_box">
              <input type="email" placeholder="Enter your email" required />
              <i class="uil uil-envelope-alt email"></i>
            </div>
            <div class="input_box">
              <input type="password" placeholder="Enter your password" required />
              <i class="uil uil-lock password"></i>
              <i class="uil uil-eye-slash pw_hide"></i>
            </div>

            <div class="option_field">
              <span class="checkbox">
                <input type="checkbox" id="check" />
                <label for="check">Remember me</label>
              </span>
              <a href="#" class="forgot_pw">Forgot password?</a>
            </div>

            <button class="button">Login Now</button>

            <div class="login_signup">Don't have an account? <a href="#" id="signup">Signup</a></div>
          </form>
        </div>

        <!-- Signup From -->
        <div class="form signup_form">
          <form action="#">
            <h2>Signup</h2>

            <div class="input_box">
              <input type="email" placeholder="Enter your email" required />
              <i class="uil uil-envelope-alt email"></i>
            </div>
            <div class="input_box">
              <input type="password" placeholder="Create password" required />
              <i class="uil uil-lock password"></i>
              <i class="uil uil-eye-slash pw_hide"></i>
            </div>
            <div class="input_box">
              <input type="password" placeholder="Confirm password" required />
              <i class="uil uil-lock password"></i>
              <i class="uil uil-eye-slash pw_hide"></i>
            </div>

            <button class="button">Signup Now</button>

            <div class="login_signup">Already have an account? <a href="#" id="login">Login</a></div>
          </form>
        </div>
      </div>
    </section>

    <script src="script.js"></script>
  </body>
</html>Second, paste the following codes into your style.css file.
/* Import Google font - Poppins */
@import url("https://fonts.googleapis.com/css2?family=Poppins:wght@200;300;400;500;600;700&display=swap");
* {
  margin: 0;
  padding: 0;
  box-sizing: border-box;
  font-family: "Poppins", sans-serif;
}
a {
  text-decoration: none;
}
.header {
  position: fixed;
  height: 80px;
  width: 100%;
  z-index: 100;
  padding: 0 20px;
}
.nav {
  max-width: 1100px;
  width: 100%;
  margin: 0 auto;
}
.nav,
.nav_item {
  display: flex;
  height: 100%;
  align-items: center;
  justify-content: space-between;
}
.nav_logo,
.nav_link,
.button {
  color: #fff;
}
.nav_logo {
  font-size: 25px;
}
.nav_item {
  column-gap: 25px;
}
.nav_link:hover {
  color: #d9d9d9;
}
.button {
  padding: 6px 24px;
  border: 2px solid #fff;
  background: transparent;
  border-radius: 6px;
  cursor: pointer;
}
.button:active {
  transform: scale(0.98);
}

/* Home */
.home {
  position: relative;
  height: 100vh;
  width: 100%;
  background-image: url("bg.jpg");
  background-size: cover;
  background-position: center;
}
.home::before {
  content: "";
  position: absolute;
  height: 100%;
  width: 100%;
  background-color: rgba(0, 0, 0, 0.6);
  z-index: 100;
  opacity: 0;
  pointer-events: none;
  transition: all 0.5s ease-out;
}
.home.show::before {
  opacity: 1;
  pointer-events: auto;
}
/* From */
.form_container {
  position: fixed;
  max-width: 320px;
  width: 100%;
  top: 50%;
  left: 50%;
  transform: translate(-50%, -50%) scale(1.2);
  z-index: 101;
  background: #fff;
  padding: 25px;
  border-radius: 12px;
  box-shadow: rgba(0, 0, 0, 0.1);
  opacity: 0;
  pointer-events: none;
  transition: all 0.4s ease-out;
}
.home.show .form_container {
  opacity: 1;
  pointer-events: auto;
  transform: translate(-50%, -50%) scale(1);
}
.signup_form {
  display: none;
}
.form_container.active .signup_form {
  display: block;
}
.form_container.active .login_form {
  display: none;
}
.form_close {
  position: absolute;
  top: 10px;
  right: 20px;
  color: #0b0217;
  font-size: 22px;
  opacity: 0.7;
  cursor: pointer;
}
.form_container h2 {
  font-size: 22px;
  color: #0b0217;
  text-align: center;
}
.input_box {
  position: relative;
  margin-top: 30px;
  width: 100%;
  height: 40px;
}
.input_box input {
  height: 100%;
  width: 100%;
  border: none;
  outline: none;
  padding: 0 30px;
  color: #333;
  transition: all 0.2s ease;
  border-bottom: 1.5px solid #aaaaaa;
}
.input_box input:focus {
  border-color: #7d2ae8;
}
.input_box i {
  position: absolute;
  top: 50%;
  transform: translateY(-50%);
  font-size: 20px;
  color: #707070;
}
.input_box i.email,
.input_box i.password {
  left: 0;
}
.input_box input:focus ~ i.email,
.input_box input:focus ~ i.password {
  color: #7d2ae8;
}
.input_box i.pw_hide {
  right: 0;
  font-size: 18px;
  cursor: pointer;
}
.option_field {
  margin-top: 14px;
  display: flex;
  align-items: center;
  justify-content: space-between;
}
.form_container a {
  color: #7d2ae8;
  font-size: 12px;
}
.form_container a:hover {
  text-decoration: underline;
}
.checkbox {
  display: flex;
  column-gap: 8px;
  white-space: nowrap;
}
.checkbox input {
  accent-color: #7d2ae8;
}
.checkbox label {
  font-size: 12px;
  cursor: pointer;
  user-select: none;
  color: #0b0217;
}
.form_container .button {
  background: #7d2ae8;
  margin-top: 30px;
  width: 100%;
  padding: 10px 0;
  border-radius: 10px;
}
.login_signup {
  font-size: 12px;
  text-align: center;
  margin-top: 15px;
}Third, paste the following codes into your script.js file.
const formOpenBtn = document.querySelector("#form-open"),
  home = document.querySelector(".home"),
  formContainer = document.querySelector(".form_container"),
  formCloseBtn = document.querySelector(".form_close"),
  signupBtn = document.querySelector("#signup"),
  loginBtn = document.querySelector("#login"),
  pwShowHide = document.querySelectorAll(".pw_hide");

formOpenBtn.addEventListener("click", () => home.classList.add("show"));
formCloseBtn.addEventListener("click", () => home.classList.remove("show"));

pwShowHide.forEach((icon) => {
  icon.addEventListener("click", () => {
    let getPwInput = icon.parentElement.querySelector("input");
    if (getPwInput.type === "password") {
      getPwInput.type = "text";
      icon.classList.replace("uil-eye-slash", "uil-eye");
    } else {
      getPwInput.type = "password";
      icon.classList.replace("uil-eye", "uil-eye-slash");
    }
  });
});

signupBtn.addEventListener("click", (e) => {
  e.preventDefault();
  formContainer.classList.add("active");
});
loginBtn.addEventListener("click", (e) => {
  e.preventDefault();
  formContainer.classList.remove("active");
});
That’s all, now you’ve successfully created a Website with a Login & Registration Form. If your code doesn’t work or you’ve faced any problems, please download the source code files from the given download button. It’s free and a zip file containing the project folder with source code files will be downloaded.

[…] How To Create a Secure Login Page Using HTML, CSS, and JavaScript […]