Building Mobile-Friendly Cards with HTML and CSS
Perhaps you’ve seen cards on many websites. Cards are crucial online components used to highlight condensed content, product details, or user profiles. Making responsive cards might be a useful project for learning the foundational ideas of CSS, such as positing, flexbox, and grid layouts, if you’re a novice web developer.
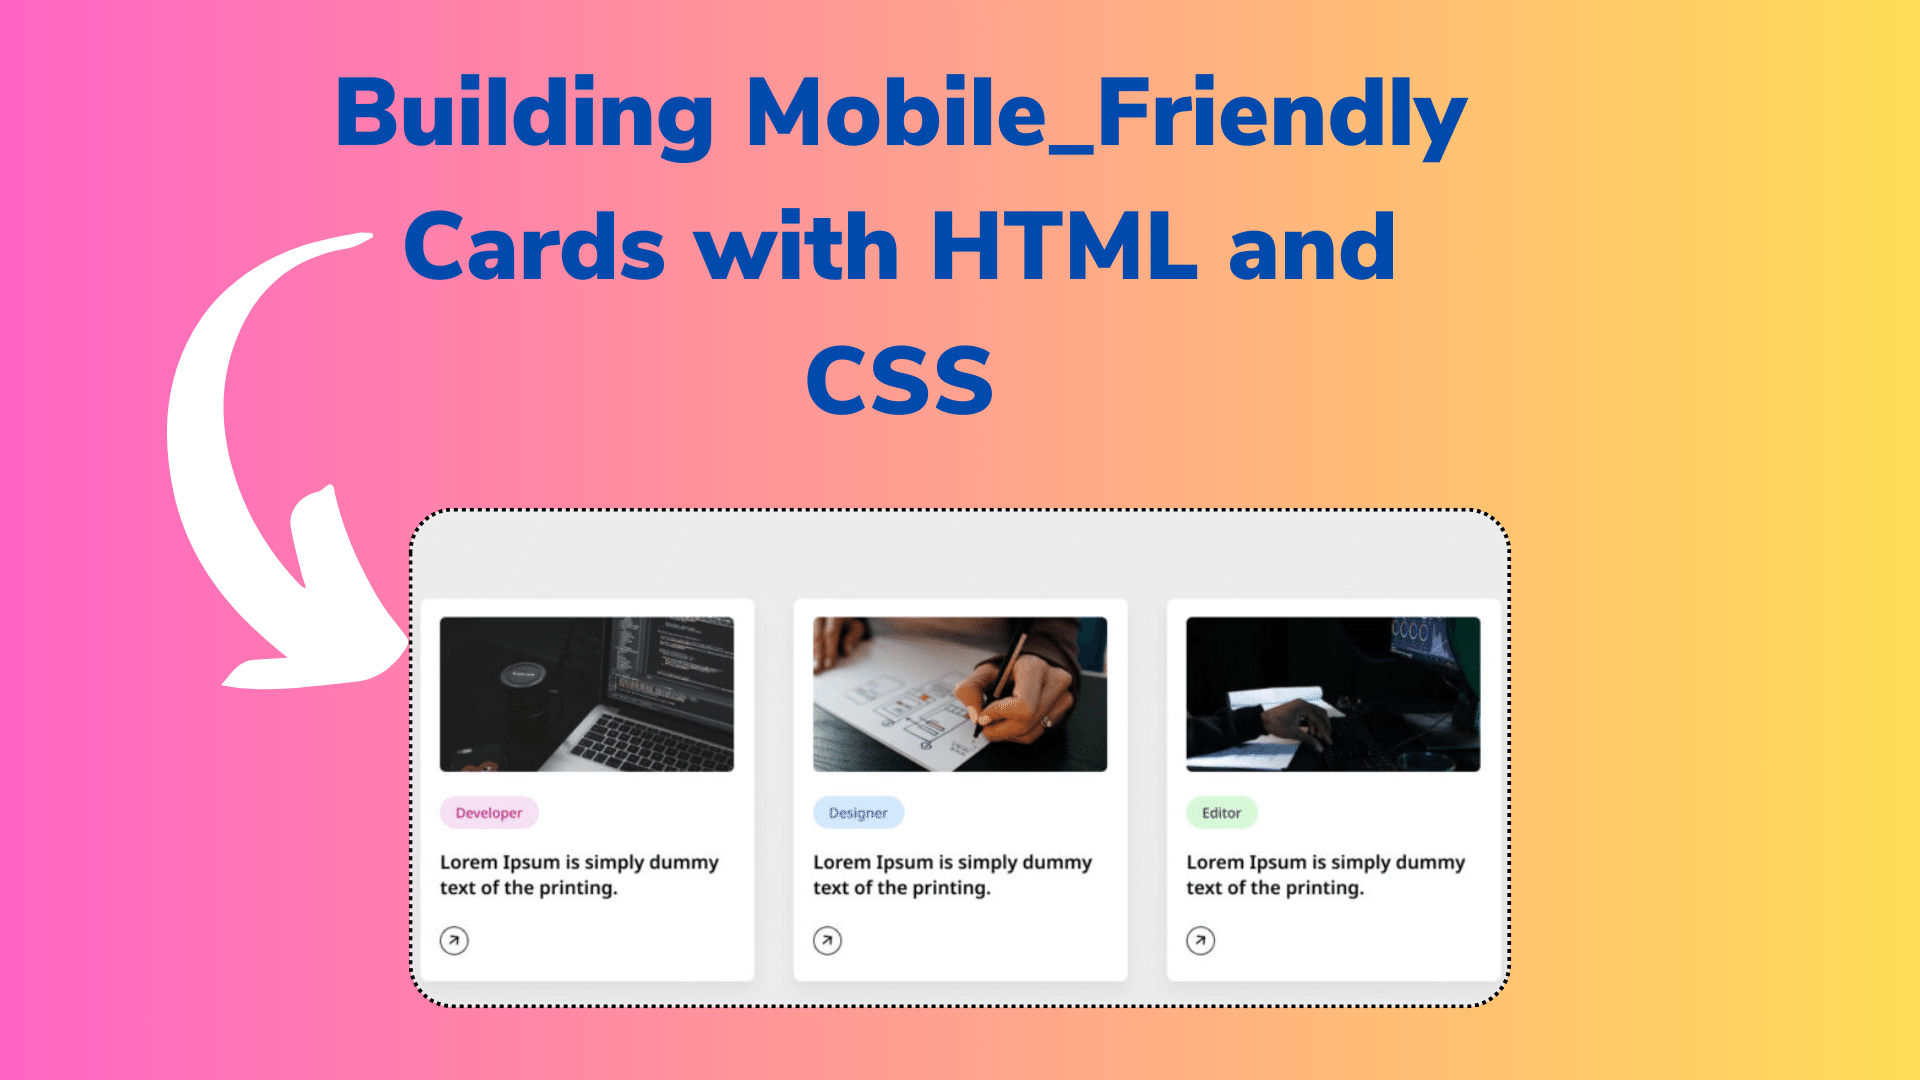
I’ll walk you through making a responsive card design with HTML and CSS in this blog article. Three cards—each with a picture, a title, and a button—will be visible on the screen. A straightforward border animation will display as you hover over the card.
Perhaps you’ve seen cards on many websites. Cards are crucial online components used to highlight condensed content, product details, or user profiles. Especially if you’re a novice web developer,
We will utilize standard HTML components like div a, image, header, and basic CSS attributes to design and responsively build this card. You shouldn’t have any problem following the instructions and comprehending the coding because this project is easy to grasp and basic.
Using HTML and CSS to Create a Responsive Card
Utilize HTML and CSS to build a responsive card design by following these easy step-by-step instructions:
- First, create a folder with any name you like. Then, put the necessary files inside it.
- Create a file called
index.htmlto serve as the main file. - Create a file called
style.cssfor the CSS code. - Finally, download the Images folder and place it in your project directory. This folder contains all the images you’ll need for this card project.
You Might Like This :
Add the following HTML codes to your index.html file to get started: In order to generate our card layout, this code uses fundamental HTML markup with several semantic elements like div, image, and header.
<!DOCTYPE html>
<!-- Coding By CodingNepal - www.codingnepalweb.com -->
<html lang="en">
<head>
    <meta charset="UTF-8">
    <meta name="viewport" content="width=device-width, initial-scale=1.0">
    <title>Responsive Card Design HTML and CSS | CodingNepal</title>
    <!-- Font Awesome Icons -->
    <link rel="stylesheet" href="https://cdnjs.cloudflare.com/ajax/libs/font-awesome/6.4.2/css/all.min.css">
    <!-- Custom CSS -->
    <link rel="stylesheet" href="style.css">
</head>
<body>
    <div class="card-list">
        <a href="#" class="card-item">
            <img src="images/developer.jpg" alt="Card Image">
            <span class="developer">Developer</span>
            <h3>A "developer" codes software and websites.</h3>
            <div class="arrow">
                <i class="fas fa-arrow-right card-icon"></i>
            </div>
        </a>
        <a href="#" class="card-item">
            <img src="images/designer.jpg" alt="Card Image">
            <span class="designer">Designer</span>
            <h3>A "designer" is a design expert.</h3>
            <div class="arrow">
                <i class="fas fa-arrow-right card-icon"></i>
            </div>
        </a>
        <a href="#" class="card-item">
            <img src="images/editor.jpg" alt="Card Image">
            <span class="editor">Editor</span>
            <h3>An "editor" ensures content quality and accuracy.</h3>
            <div class="arrow">
                <i class="fas fa-arrow-right card-icon"></i>
            </div>
        </a>
    </div>
</body>
</html>
Then, include the subsequent CSS codes in your style.Make your card beautiful and responsive with a css file. To make your card even prettier, feel free to play around with other CSS attributes, such as colors, fonts, backgrounds, etc.
/* Importing Google font - Open Sans */
@import url('https://fonts.googleapis.com/css2?family=Open+Sans:wght@300;400;500;600;700&display=swap');

* {
    margin: 0;
    padding: 0;
    box-sizing: border-box;
    font-family: 'Open Sans', sans-serif;
}

body {
    background: #ecececdb;
}

.card-list {
    display: grid;
    grid-template-columns: repeat(auto-fill, minmax(300px, 1fr));
    max-width: 1250px;
    margin: 150px auto;
    padding: 20px;
    gap: 20px;
}

.card-list .card-item {
    background: #fff;
    padding: 26px;
    border-radius: 8px;
    box-shadow: 0px 5px 10px rgba(0, 0, 0, 0.04);
    list-style: none;
    cursor: pointer;
    text-decoration: none;
    border: 2px solid transparent;
    transition: border 0.5s ease;
}

.card-list .card-item:hover {
    border: 2px solid #000;
}

.card-list .card-item img {
    width: 100%;
    aspect-ratio: 16/9;
    border-radius: 8px;
    object-fit: cover;
}

.card-list span {
    display: inline-block;
    background: #F7DFF5;
    margin-top: 32px;
    padding: 8px 15px;
    font-size: 0.75rem;
    border-radius: 50px;
    font-weight: 600;
}

.card-list .developer {
    background-color: #F7DFF5;
    color: #B22485;
}

.card-list .designer {
    background-color: #d1e8ff;
    color: #2968a8;
}

.card-list .editor {
    background-color: #d6f8d6;
    color: #205c20;
}

.card-item h3 {
    color: #000;
    font-size: 1.438rem;
    margin-top: 28px;
    font-weight: 600;
}

.card-item .arrow {
    display: flex;
    align-items: center;
    justify-content: center;
    transform: rotate(-35deg);
    height: 40px;
    width: 40px;
    color: #000;
    border: 1px solid #000;
    border-radius: 50%;
    margin-top: 40px;
    transition: 0.2s ease;
}

.card-list .card-item:hover .arrow  {
    background: #000;
    color: #fff;
}

@media (max-width: 1200px) {
    .card-list .card-item {
        padding: 15px;
    }
}

@media screen and (max-width: 980px) {
    .card-list {
        margin: 0 auto;
    }
}
Conclusion and closing remarks
In conclusion, developing responsive CSS cards is a straightforward yet useful project for novice web developers to put their just discovered HTML and CSS abilities to use. I’m certain that by using the instructions and scripts in this post, you were able to successfully make your own CSS cards.
I advise you to attempt duplicating additional useful website elements like card designs, login forms, navigation bars, website homepages, etc. to further hone your HTML and CSS abilities.