How to Creating a Contact Form in PHP for Your Website
Hello friends! In this blog post, you’ll learn how to use PHP to develop a working contact form. To build this functional contact form, I’ll utilize HTML, CSS, JavaScript, and PHP. It’s time to develop a contact form in PHP after learning how to send emails using PHP from Localhost in a previous blog post.
An essential component of a page that enables people to contact the website owner is the contact form. There are places on this contact form where you may enter information such your name, email address, subject, and message. Depending on the needs of your website, you can add or delete fields.
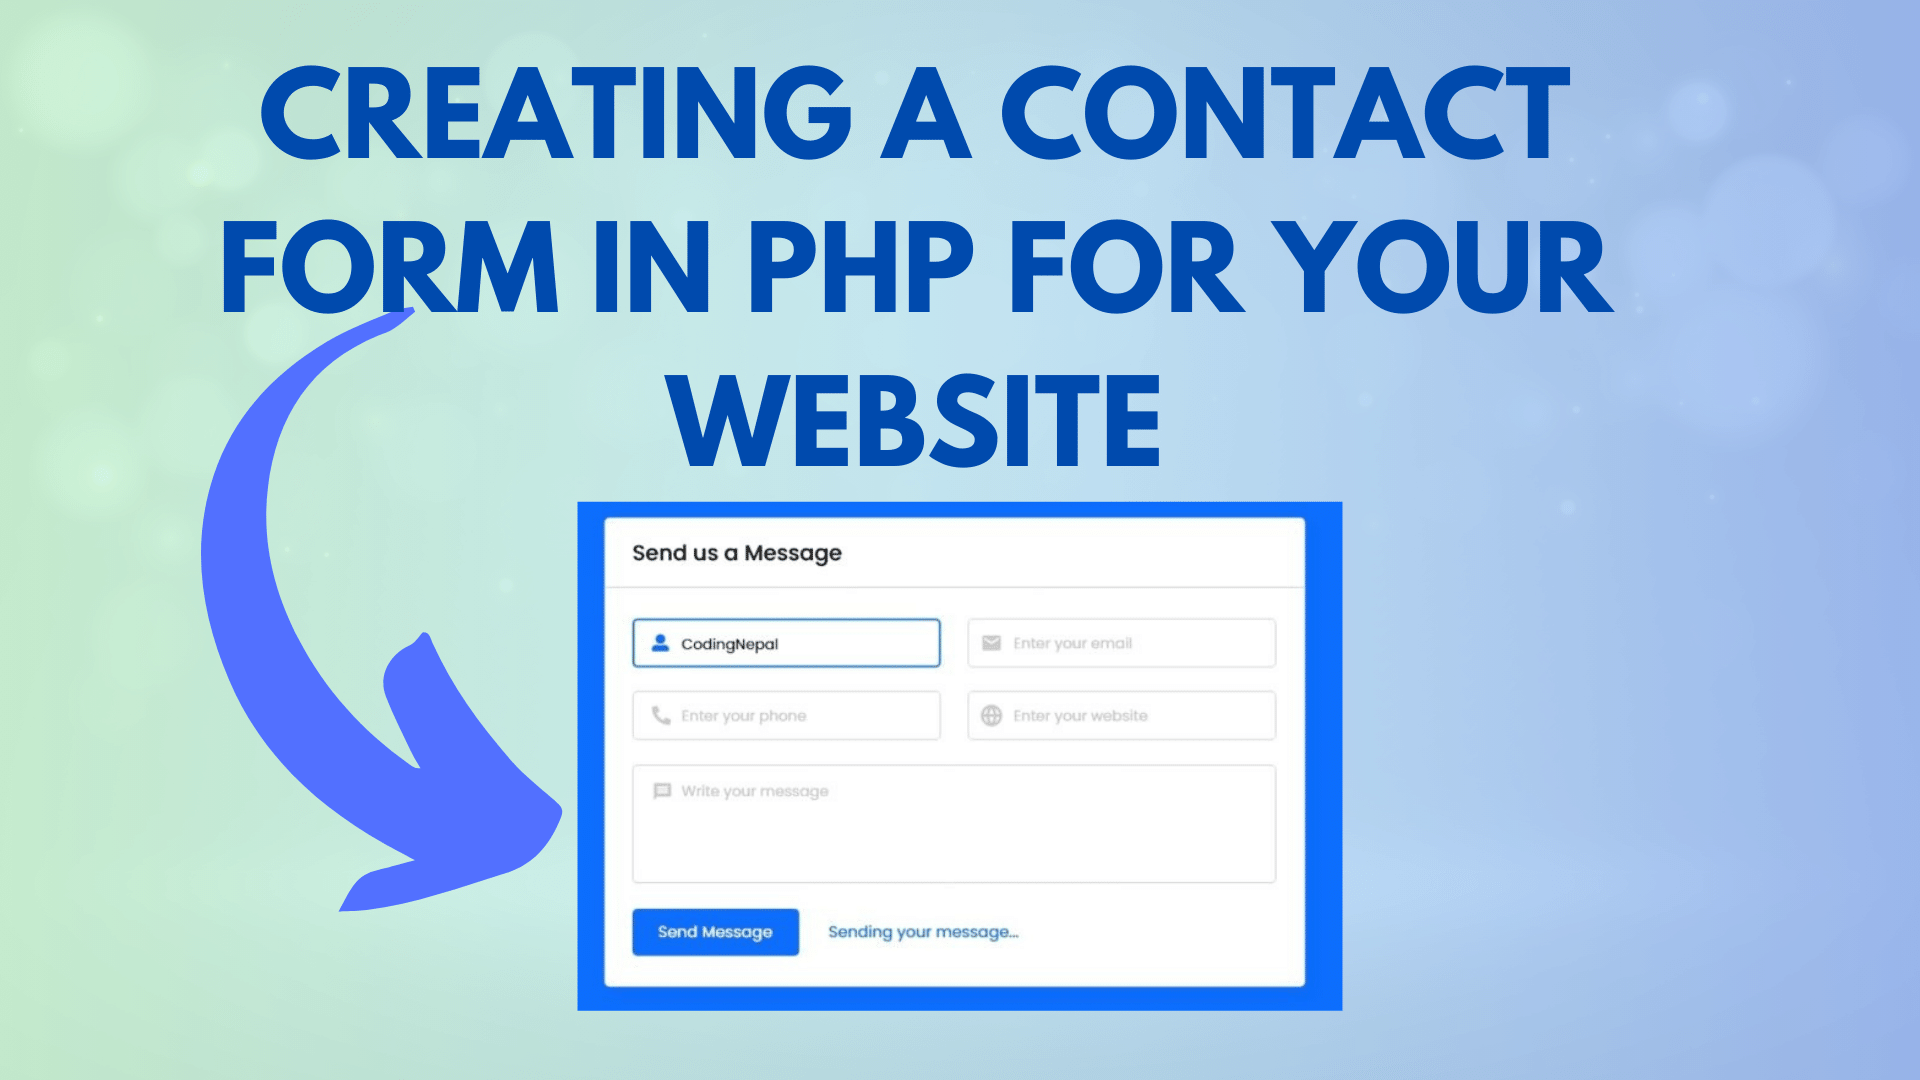
As you can see in the image preview, this project [Contact Form in PHP] includes a contact form with a heading, input fields, button, and status text. This text is dynamic, which means it changes based on the status of the form and notifies the user if their message has been sent, sent successfully, or failed. Since the user must input a valid email address and message in order to send a message, this contact form is completely verified. You may view a tutorial or a sample of this contact form.
Video Tutorial of Working Contact Form in PHP
You saw a demonstration of this contact form in the video, which I made with PHP, HTML, CSS, and JavaScript. I really hope you enjoy using this PHP contact form and are interested in the source code. If so, don’t worry; I’ve published the project’s codes at the bottom of this page, where you can easily copy and paste them or download them.
To begin with, read this blog post through to the conclusion to comprehend the php codes and principles used to create this contact form. So that this contact form doesn’t reload when your message is going to send, fail, or send, I utilized ajax in JavaScript. I transferred all form data—including name, email address, phone number, website, and message—to the PHP code using ajax, and I received it all there.
You Might Like This :
- Download YouTube Video Preview Images with PHP & JavaScript
- How to Fix the “$ operator is invalid for atomic vectors” Error in R
Following the collection of all user data, I verified if the user had provided a legitimate email address and message, as these two areas are required. Using PHP’s built-in mail() function, I sent the user’s message and valid email to the address they gave, and that is all.
I sent an error message with the cause if a message could not be delivered because of an invalid email address, an empty message box, or a network problem. I then showed this error on the contact form using JavaScript.
Making a PHP Contact Form That Works [Source Codes]
to build this project [PHP Contact Form]. Four files must first be created: HTML, CSS, JavaScript, and PHP files. Simply insert the following codes into your file after producing these files. The PHP & JavaScript source code files for this Contact Form are also available for download through the provided download button.
Create an HTML file first with the name index.html, and then put the provided codes into it. Keep in mind that you must generate a file with the.html extension.
<!DOCTYPE html>
<!-- Coding By CodingNepal - youtube.com/codingnepal -->
<html lang="en">
<head>
  <meta charset="UTF-8">
  <meta name="viewport" content="width=device-width, initial-scale=1.0">
  <title>Contact Form in PHP | CodingNepal</title>
  <link rel="stylesheet" href="style.css">
  <link rel="stylesheet" href="https://fonts.googleapis.com/icon?family=Material+Icons">
  <link rel="stylesheet" href="https://cdnjs.cloudflare.com/ajax/libs/font-awesome/5.15.3/css/all.min.css"/>
</head>
<body>
  <div class="wrapper">
    <header>Send us a Message</header>
    <form action="#">
      <div class="dbl-field">
        <div class="field">
          <input type="text" name="name" placeholder="Enter your name">
          <i class='fas fa-user'></i>
        </div>
        <div class="field">
          <input type="text" name="email" placeholder="Enter your email">
          <i class='fas fa-envelope'></i>
        </div>
      </div>
      <div class="dbl-field">
        <div class="field">
          <input type="text" name="phone" placeholder="Enter your phone">
          <i class='fas fa-phone-alt'></i>
        </div>
        <div class="field">
          <input type="text" name="website" placeholder="Enter your website">
          <i class='fas fa-globe'></i>
        </div>
      </div>
      <div class="message">
        <textarea placeholder="Write your message" name="message"></textarea>
        <i class="material-icons">message</i>
      </div>
      <div class="button-area">
        <button type="submit">Send Message</button>
        <span></span>
      </div>
    </form>
  </div>

  <script src="script.js"></script>

</body>
</html>
Second, create a CSS file with the name of style.css and paste the given codes in your CSS file. Remember, you’ve to create a file with .css extension.
/* Import Google font - Poppins */
@import url('https://fonts.googleapis.com/css2?family=Poppins:wght@400;500;600&display=swap');
*{
  margin: 0;
  padding: 0;
  box-sizing: border-box;
  font-family: "Poppins", sans-serif;
}
body{
  display: flex;
  padding: 0 10px;
  min-height: 100vh;
  background: #0D6EFD;
  align-items: center;
  justify-content: center;
}
::selection{
  color: #fff;
  background: #0D6EFD;
}
.wrapper{
  width: 715px;
  background: #fff;
  border-radius: 5px;
  box-shadow: 10px 10px 10px rgba(0,0,0,0.05);
}
.wrapper header{
  font-size: 22px;
  font-weight: 600;
  padding: 20px 30px;
  border-bottom: 1px solid #ccc;
}
.wrapper form{
  margin: 35px 30px;
}
.wrapper form.disabled{
  pointer-events: none;
  opacity: 0.7;
}
form .dbl-field{
  display: flex;
  margin-bottom: 25px;
  justify-content: space-between;
}
.dbl-field .field{
  height: 50px;
  display: flex;
  position: relative;
  width: calc(100% / 2 - 13px);
}
.wrapper form i{
  position: absolute;
  top: 50%;
  left: 18px;
  color: #ccc;
  font-size: 17px;
  pointer-events: none;
  transform: translateY(-50%);
}
form .field input,
form .message textarea{
  width: 100%;
  height: 100%;
  outline: none;
  padding: 0 18px 0 48px;
  font-size: 16px;
  border-radius: 5px;
  border: 1px solid #ccc;
}
.field input::placeholder,
.message textarea::placeholder{
  color: #ccc;
}
.field input:focus,
.message textarea:focus{
  padding-left: 47px;
  border: 2px solid #0D6EFD;
}
.field input:focus ~ i,
.message textarea:focus ~ i{
  color: #0D6EFD;
}
form .message{
  position: relative;
}
form .message i{
  top: 30px;
  font-size: 20px;
}
form .message textarea{
  min-height: 130px;
  max-height: 230px;
  max-width: 100%;
  min-width: 100%;
  padding: 15px 20px 0 48px;
}
form .message textarea::-webkit-scrollbar{
  width: 0px;
}
.message textarea:focus{
  padding-top: 14px;
}
form .button-area{
  margin: 25px 0;
  display: flex;
  align-items: center;
}
.button-area button{
  color: #fff;
  border: none;
  outline: none;
  font-size: 18px;
  cursor: pointer;
  border-radius: 5px;
  padding: 13px 25px;
  background: #0D6EFD;
  transition: background 0.3s ease;
}
.button-area button:hover{
  background: #025ce3;
}
.button-area span{
  font-size: 17px;
  margin-left: 30px;
  display: none;
}
@media (max-width: 600px){
  .wrapper header{
    text-align: center;
  }
  .wrapper form{
    margin: 35px 20px;
  }
  form .dbl-field{
    flex-direction: column;
    margin-bottom: 0px;
  }
  form .dbl-field .field{
    width: 100%;
    height: 45px;
    margin-bottom: 20px;
  }
  form .message textarea{
    resize: none;
  }
  form .button-area{
    margin-top: 20px;
    flex-direction: column;
  }
  .button-area button{
    width: 100%;
    padding: 11px 0;
    font-size: 16px;
  }
  .button-area span{
    margin: 20px 0 0;
    text-align: center;
  }
}
Third, Paste the provided codes into your JavaScript file, which should be called script.js. Keep in mind that you must produce a file with the.js suffix.
//Contact Form in PHP
const form = document.querySelector("form"),
statusTxt = form.querySelector(".button-area span");
form.onsubmit = (e)=>{
  e.preventDefault();
  statusTxt.style.color = "#0D6EFD";
  statusTxt.style.display = "block";
  statusTxt.innerText = "Sending your message...";
  form.classList.add("disabled");

  let xhr = new XMLHttpRequest();
  xhr.open("POST", "message.php", true);
  xhr.onload = ()=>{
    if(xhr.readyState == 4 && xhr.status == 200){
      let response = xhr.response;
      if(response.indexOf("required") != -1 || response.indexOf("valid") != -1 || response.indexOf("failed") != -1){
        statusTxt.style.color = "red";
      }else{
        form.reset();
        setTimeout(()=>{
          statusTxt.style.display = "none";
        }, 3000);
      }
      statusTxt.innerText = response;
      form.classList.remove("disabled");
    }
  }
  let formData = new FormData(form);
  xhr.send(formData);
}
Last,Paste the above codes into your message.php PHP file after creating it. The file must have the.php extension. Remember to input the email address you wish to receive all messages at after pasting these PHP codes into the $receiver variable.
//Contact Form in PHP
<?php
  $name = htmlspecialchars($_POST['name']);
  $email = htmlspecialchars($_POST['email']);
  $phone = htmlspecialchars($_POST['phone']);
  $website = htmlspecialchars($_POST['website']);
  $message = htmlspecialchars($_POST['message']);

  if(!empty($email) && !empty($message)){
    if(filter_var($email, FILTER_VALIDATE_EMAIL)){
      $receiver = "receiver_email_address"; //enter that email address where you want to receive all messages
      $subject = "From: $name <$email>";
      $body = "Name: $name\nEmail: $email\nPhone: $phone\nWebsite: $website\n\nMessage:\n$message\n\nRegards,\n$name";
      $sender = "From: $email";
      if(mail($receiver, $subject, $body, $sender)){
         echo "Your message has been sent";
      }else{
         echo "Sorry, failed to send your message!";
      }
    }else{
      echo "Enter a valid email address!";
    }
  }else{
    echo "Email and message field is required!";
  }
?>
That’s all; you’ve now successfully built a PHP contact form. Please obtain the source code files from the provided download button if your code doesn’t function or you’ve encountered any errors or problems. It’s free and a .zip file will be downloaded then you’ve to unzip it. However, it won’t function on your localhost, therefore you must upload it to a web server in order for it to function.
Open the message.php file after extracting the downloaded zip file on your computer in order to post it to an internet server. You must specify the email address you wish to receive all messages into the $receiver variable found in this file. After inputting the email, just save this file, create a zip file from this folder, and then upload and unpack it to your hosting. You are now prepared to receive messages from visitors using this PHP contact form.

[…] Creating a Contact Form in PHP for Your Website […]