How to Create Validate User Input: HTML, CSS, and JavaScript Form Validation
In web development, forms are essential because they let users enter and submit data. But it’s crucial to make sure the data is accurate and intact. Form validation is useful in this situation.
Form validation involves ensuring that the data entered by users in a form meets specific criteria and is valid. Its primary purpose is to prevent the submission of incomplete or invalid data.
This blog post is designed to guide beginner web developers through the process of form validation using HTML, CSS, and JavaScript. You will start from scratch, learning how to create a responsive form using HTML and CSS. Then, we will dive into the world of form validation and explore how to apply it effectively using JavaScript.
Additionally, you’ll also learn how to show or hide password visibility on the toggle button click. To see a live demo of this form validation in action, scroll to the bottom of this page and click on the Download button.
You Might Like This:
- Learn to Code: Netflix-Like Login Page in HTML and CSS
- Create A Glassmorphism Login Form Using HTML and CSS
- Create A Beautiful Responsive Website Using HTML and CSS
- Responsive Drop Down Menu with Sub Menu Using HTML & CSS [ Free Source Code]
Steps For Creating Form Validation in HTML
To create a form and do the validation using HTML, CSS, and vanilla JavaScript, follow the given steps line by line:
- Create a folder. You can name this folder whatever you want, and inside this folder, create the mentioned files.
- Create an
index.htmlfile. The file name must be index and its extension .html - Create an
thank-you.htmlfile. The file name must be index and its extension .html - Create a
style.cssfile. The file name must be style and its extension .css - Create a
script.jsfile. The file name must be script and its extension .js
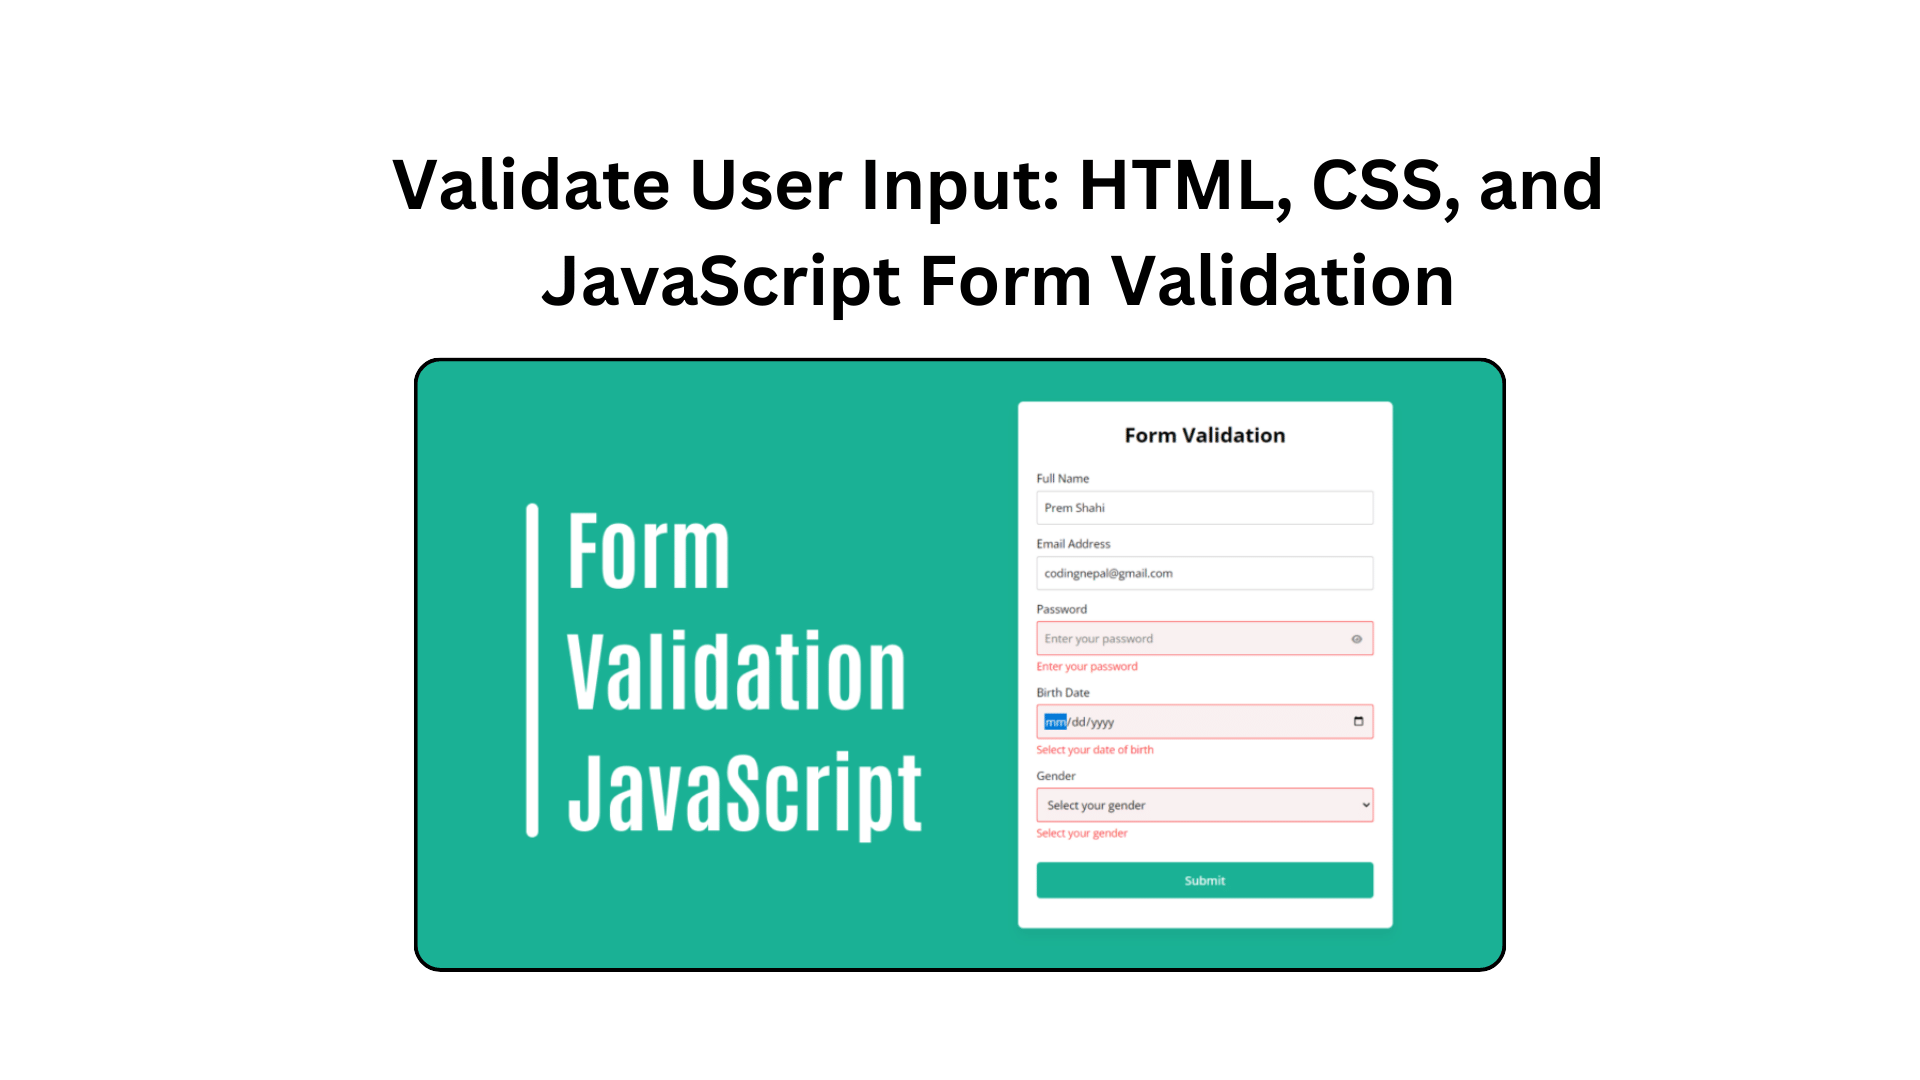
To start, add the following HTML codes to your index.html file to create a basic form layout: This form includes full name, email, password, date of birth, and gender fields, but you can add or remove fields as desired.
<!DOCTYPE html>
<!-- Website - www.codingnepalweb.com -->
<html lang="en">
  <head>
    <meta charset="UTF-8">
    <meta name="viewport" content="width=device-width, initial-scale=1.0">
    <title>Form Validation in HTML | CodingNepal</title>
    <link rel="stylesheet" href="style.css">
    <!-- Fontawesome CDN Link For Icons -->
    <link rel="stylesheet" href="https://cdnjs.cloudflare.com/ajax/libs/font-awesome/6.2.1/css/all.min.css" />
  </head>
  <body>
    <form action="thank-you.html">
      <h2>Form Validation</h2>
      <div class="form-group fullname">
        <label for="fullname">Full Name</label>
        <input type="text" id="fullname" placeholder="Enter your full name">
      </div>
      <div class="form-group email">
        <label for="email">Email Address</label>
        <input type="text" id="email" placeholder="Enter your email address">
      </div>
      <div class="form-group password">
        <label for="password">Password</label>
        <input type="password" id="password" placeholder="Enter your password">
        <i id="pass-toggle-btn" class="fa-solid fa-eye"></i>
      </div>
      <div class="form-group date">
        <label for="date">Birth Date</label>
        <input type="date" id="date" placeholder="Select your date">
      </div>
      <div class="form-group gender">
        <label for="gender">Gender</label>
        <select id="gender">
          <option value="" selected disabled>Select your gender</option>
          <option value="Male">Male</option>
          <option value="Female">Female</option>
          <option value="Other">Other</option>
        </select>
      </div>
      <div class="form-group submit-btn">
        <input type="submit" value="Submit">
      </div>
    </form>

    <script src="script.js"></script>
  </body>
</html>
Next, add the following HTML codes to your thank-you.html file: When the user fills out the form with valid data, they will be redirected to this HTML page. This page includes only a heading that says, “Thank you for filling out the form correctly.”.
<!DOCTYPE html>
<html lang="en">
<head>
    <meta charset="UTF-8">
    <meta name="viewport" content="width=device-width, initial-scale=1.0">
    <title>Thanks page</title>
</head>
<body>
    <h1>Thank you for filling out the form correctly.</h1>
</body>
</html>
Next, add the following CSS codes to your style.css file to style the form and make it responsive and beautiful. You can customize this code to your liking by adjusting the color, font, size, and other CSS properties.
@import url('https://fonts.googleapis.com/css2?family=Open+Sans:wght@400;500;600;700&display=swap');

* {
  margin: 0;
  padding: 0;
  box-sizing: border-box;
  font-family: 'Open Sans', sans-serif;
}

body {
  display: flex;
  align-items: center;
  justify-content: center;
  padding: 0 10px;
  min-height: 100vh;
  background: #1BB295;
}

form {
  padding: 25px;
  background: #fff;
  max-width: 500px;
  width: 100%;
  border-radius: 7px;
  box-shadow: 0 10px 15px rgba(0, 0, 0, 0.05);
}

form h2 {
  font-size: 27px;
  text-align: center;
  margin: 0px 0 30px;
}

form .form-group {
  margin-bottom: 15px;
  position: relative;
}

form label {
  display: block;
  font-size: 15px;
  margin-bottom: 7px;
}

form input,
form select {
  height: 45px;
  padding: 10px;
  width: 100%;
  font-size: 15px;
  outline: none;
  background: #fff;
  border-radius: 3px;
  border: 1px solid #bfbfbf;
}

form input:focus,
form select:focus {
  border-color: #9a9a9a;
}

form input.error,
form select.error {
  border-color: #f91919;
  background: #f9f0f1;
}

form small {
  font-size: 14px;
  margin-top: 5px;
  display: block;
  color: #f91919;
}

form .password i {
  position: absolute;
  right: 0px;
  height: 45px;
  top: 28px;
  font-size: 13px;
  line-height: 45px;
  width: 45px;
  cursor: pointer;
  color: #939393;
  text-align: center;
}

.submit-btn {
  margin-top: 30px;
}

.submit-btn input {
  color: white;
  border: none;
  height: auto;
  font-size: 16px;
  padding: 13px 0;
  border-radius: 5px;
  cursor: pointer;
  font-weight: 500;
  text-align: center;
  background: #1BB295;
  transition: 0.2s ease;
}

.submit-btn input:hover {
  background: #179b81;
}Finally, add the following JavaScript code to your script.js file to enable form validation, display appropriate error messages, and implement the toggle functionality for password visibility.
// Selecting form and input elements
const form = document.querySelector("form");
const passwordInput = document.getElementById("password");
const passToggleBtn = document.getElementById("pass-toggle-btn");

// Function to display error messages
const showError = (field, errorText) => {
    field.classList.add("error");
    const errorElement = document.createElement("small");
    errorElement.classList.add("error-text");
    errorElement.innerText = errorText;
    field.closest(".form-group").appendChild(errorElement);
}

// Function to handle form submission
const handleFormData = (e) => {
    e.preventDefault();

    // Retrieving input elements
    const fullnameInput = document.getElementById("fullname");
    const emailInput = document.getElementById("email");
    const dateInput = document.getElementById("date");
    const genderInput = document.getElementById("gender");

    // Getting trimmed values from input fields
    const fullname = fullnameInput.value.trim();
    const email = emailInput.value.trim();
    const password = passwordInput.value.trim();
    const date = dateInput.value;
    const gender = genderInput.value;

    // Regular expression pattern for email validation
    const emailPattern = /^[^ ]+@[^ ]+\.[a-z]{2,3}$/;

    // Clearing previous error messages
    document.querySelectorAll(".form-group .error").forEach(field => field.classList.remove("error"));
    document.querySelectorAll(".error-text").forEach(errorText => errorText.remove());

    // Performing validation checks
    if (fullname === "") {
        showError(fullnameInput, "Enter your full name");
    }
    if (!emailPattern.test(email)) {
        showError(emailInput, "Enter a valid email address");
    }
    if (password === "") {
        showError(passwordInput, "Enter your password");
    }
    if (date === "") {
        showError(dateInput, "Select your date of birth");
    }
    if (gender === "") {
        showError(genderInput, "Select your gender");
    }

    // Checking for any remaining errors before form submission
    const errorInputs = document.querySelectorAll(".form-group .error");
    if (errorInputs.length > 0) return;

    // Submitting the form
    form.submit();
}

// Toggling password visibility
passToggleBtn.addEventListener('click', () => {
    passToggleBtn.className = passwordInput.type === "password" ? "fa-solid fa-eye-slash" : "fa-solid fa-eye";
    passwordInput.type = passwordInput.type === "password" ? "text" : "password";
});

// Handling form submission event
form.addEventListener("submit", handleFormData);
The Conclusion: What We’ve Learned
Finally, we defined the required input fields and their properties and began constructing the form’s HTML structure. Next, we styled components like buttons, labels, and form fields using CSS. Finally, to make sure that users enter accurate data, we implemented form validation login using JavaScript.
By following the instructions in this blog post, you should now have a functional form with validation features. For further enhancement of your web development skills, I encourage you to explore and experiment with the various types of forms and form validations provided on this website.
If you encounter any difficulties while creating your form or your code is not working as expected, you can download the source code files for this form for free by clicking the Download button.

[…] Validate User Input: HTML, CSS, and JavaScript Form Validation […]
[…] Validate User Input: HTML, CSS, and JavaScript Form Validation […]
benefits of tadalafil over sidenafil
Validate User Input: HTML, CSS, and JavaScript Form Validation – NerdyTutorials.Com